Creating a Google Adwords campaign can be quite confusing if you’ve never done it before.
That’s why I put together this step-by-step demonstration for setting one up – to help you get started.
In order to take action on this tutorial you should have already conducted keyword research. If you haven’t, read this blog post first: How To Do Keyword Research With The Adwords Planner [Step-by-Step]
To kick things off let’s go through some fundamental theory that you need to know about Google Adwords campaigns.
Fundamentals of a Google Adwords campaign
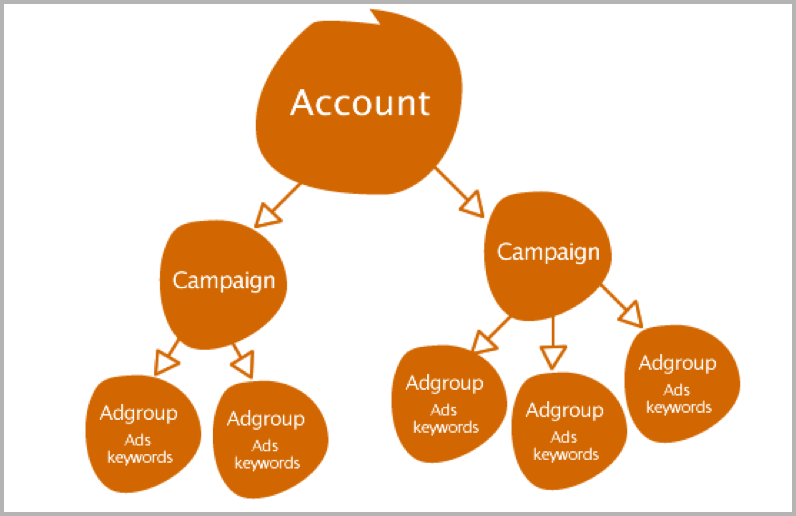
The above graphic shows how a Google Adwords account and campaign is structured.
Typically you will just have one account so you aren’t against Google’s terms of service. (Unless you have two businesses setup)
With that account, you can then have different campaigns for different things. For example, you may have different campaigns for separate products or services, or perhaps you have different campaigns for different countries or geographies.
Ad groups are really just logical chunks within campaigns, and then within ad groups you have the actual ads themselves.
Ways to Build Adwords Campaigns
As you can see in the screenshot below, there are multiple ways of building Adwords campaigns.
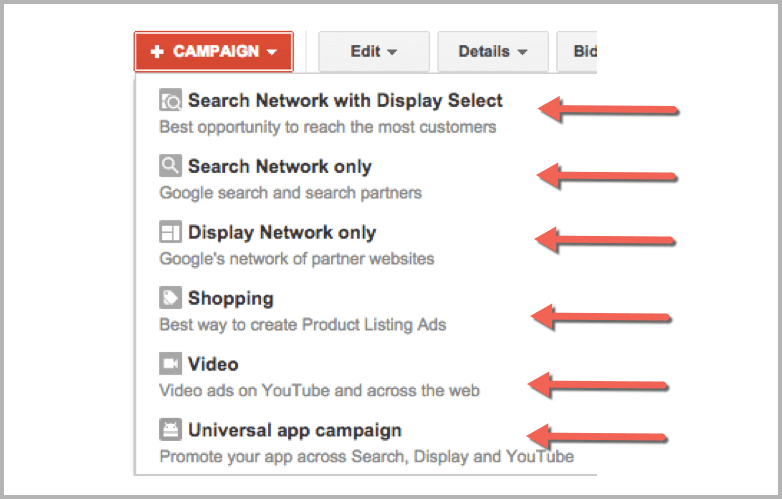
“Search Network with Display Select”, “Search Network only”, “Display Network only”, “Shopping”, “Video” and “Universal app campaign”.
The most common type of campaign that you will run is the “Search Network only” option which is turning up in the main section of a Google search query.
The “Display Network” option is when you have banner ads that turn up on other people’s websites. So if you want to run both of these types of ads, I would recommend keeping them to two different campaigns so you can track, measure and monitor performance.
Don’t be tricked into going for the “Best opportunity to reach the most customers” option at the top, because in my experience it’s not the best campaign type for getting an ROI.
Google “Shopping” is those product listing ads if you’ve got an e-commerce store, and the image shows of the product, as well as the price, with a direct link to your website. If you are an e-commerce store this type of campaign typically has a higher ROI than a normal adwords campaign.
“Video” ads are predominantly on YouTube, and the “Universal app campaign” is if you’re trying to promote an application and you want to do so across the web.
Today I want to focus on the search network ad campaigns because they are the most common, and offer the best ROI for a broad range of businesses.
Relevance + Direct Response
You may have heard me talk about this before, but it’s one of the most important things we’ve learnt about Google Adwords.
Google won the search engine war by focusing on “Relevance”. They gave people a relevant result based on their search term. Which means if relevance is their focus, we need to give them relevance as well.
“Direct Response” means that you are sending them to a page that has an effective call-to-action on it.
So keep these two factors in mind as you are building your Google Adwords campaign.
For example, if you were running a PPC campaign for a yoga instructor course and the search term was “become yoga instructor”, then make sure the ad is directly related to that. See below;
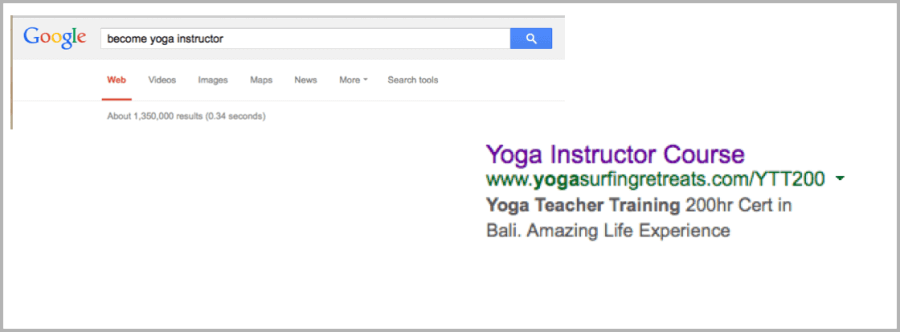
You are then sending them to a relevant page.
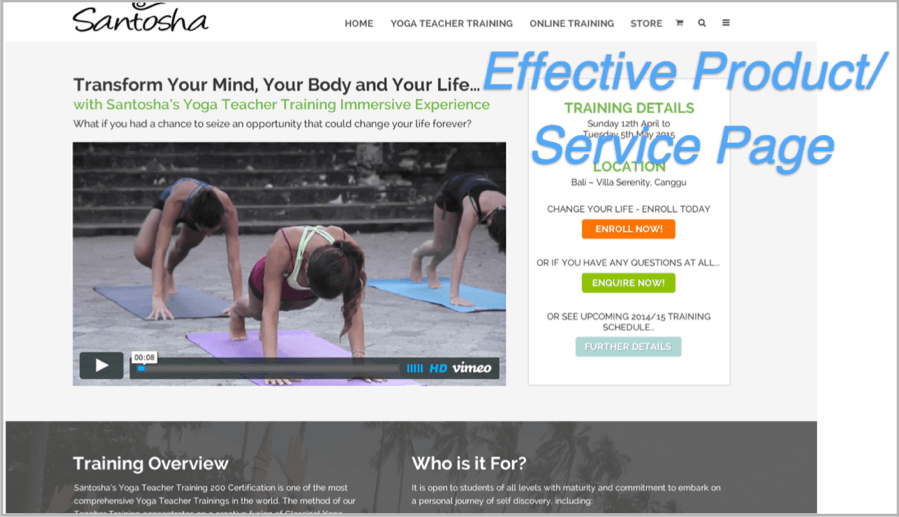
You will see in this example that we are not sending them to our home page, or another page on the site where they need to find the course. Instead it is a page already dedicated to answering the search query they had – it’s relevant.
In this example you’ll also see that there are clear calls-to-action, a headline, sub-headline and video all above the fold. Also, there is the logo and navigation menu to make it Google compliant. All the things you should consider when creating a high-converting landing page.
Fill the Holes in the Bucket with Remarketing
Remarketing is a crucial component to a successful adwords campaign because 95% of the traffic you drive is essentially wasted.
So what can you do to fill the holes in the bucket so it’s the right message, for the right person, at the right time?
Remarketing presents your messaging to these people again and again as they navigate around the web.
Prune the Dead Wood
The chance of you smashing Google Adwords out of the park on day one is highly unlikely.
In this instance, waste is the enemy of ROI.
What that means is that out of your first campaign, 20% of it is probably going to be good. What’s the 80% that’s not?
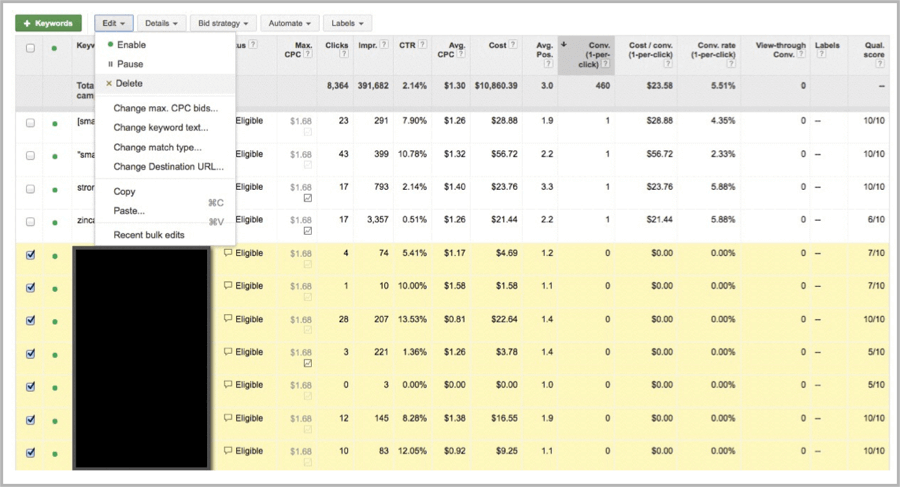
You want to find the under performing parts of a campaign and stop spending money on them.
For example you can track the conversions or sales of your ads and pause the ones that are not getting a good ROI.
How To Launch A Google AdWords Campaign [Step-by-Step Demo]
Ok so let’s get into a step-by-step demo for how to launch a Google Adwords campaign.
Step 1 – Navigate to AdWords and Choose a Campaign
So the first thing you need to do is go to your Google AdWords account and choose a campaign type.
To do so, click on the red “+ Campaign” button and choose “Search Network Only”.
Step 2 – Select Your Campaign Settings
On the next screen once you have chosen your campaign type, you’ll need to select your settings.
The first thing to do is name your campaign and tick the “All Features” check box.

When it asks you to include “Search Partners” it is referring to places such as Ask.com and other websites where Google shows ads. I chose to un-tick that option and just focus on Google search because of return on investment.
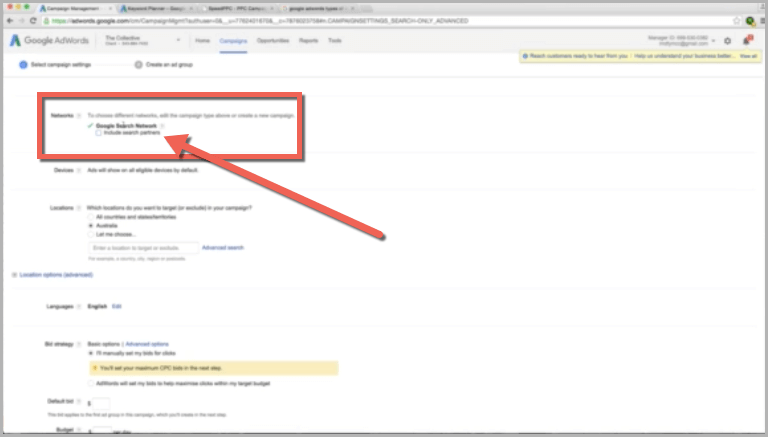
Make your way further down the settings screen and choose the location you want your ads to show in. You can target your location broadly by choosing a country, or you can more specifically focus it by choosing a state, city or even a geographical radius.
It will prompt you to choose “Automatic Bidding” or “Manual Bidding”, make sure you click on the manual bid option so that Google doesn’t automatically make up bids for your ads.
When you are setting the bid for your campaign, you want to go in strong. I call it the jail or prisoner policy… You don’t want to get beaten up in prison on your very first day. It sets a bad precedent! You won’t have a very happy time after that.
What you want to do is go in dominant, and then tune it down. So you might bid something like $2.56 initially, or a $1.76… Something that will get you some early clicks. Once you’ve got a good percentage of people clicking on your ad then you can tune them down.
For example, you don’t want to have the mindset of doing it very cost effectively on day one and go in with a low bid of $0.36. Because you’ll most likely bomb out and not get the clicks you need to.
In the same respect, you don’t want your daily budget to be too low.
So set a daily budget of at least $25-$30 a day, so the campaign can build momentum.
When choosing your schedule, you can pick a start and end date for the campaign if you like.
Also, you can choose what days and time your ad will show to people.
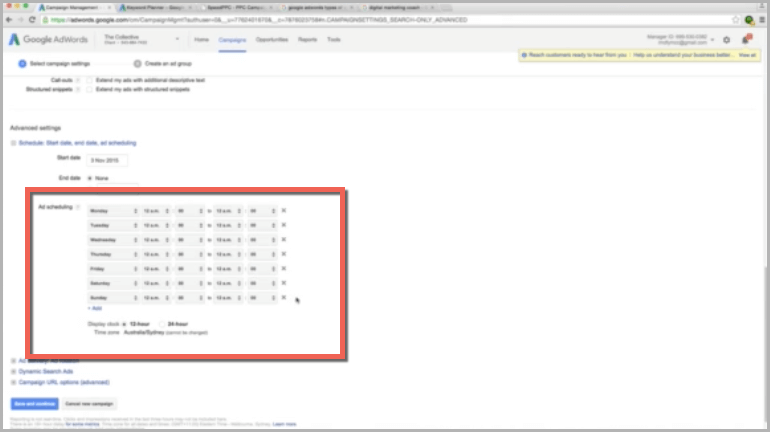
For example, some campaigns we run for businesses in the corporate world we will only run in business hours. Because they know that the traffic they are getting on the weekend is a little bit of a waste and isn’t converting as well.
But as a general rule you can leave the schedule as it is which will show your ad at all days and times initially.
When choosing your “Ad Delivery” it’s usually a good start to choose “Rotate Evenly”. This is important when you are showing more than one ad, so you can split test them and pick the one that is getting a higher click through rate. So show ads evenly for at least 90 days, and then optimise them after that.
Once you’ve finished with all the important settings, hit “Save and Continue”.
Step 3 – Name Your Ad Group and Design Your Ad
At this stage you want to create your ads based on your chosen keywords.
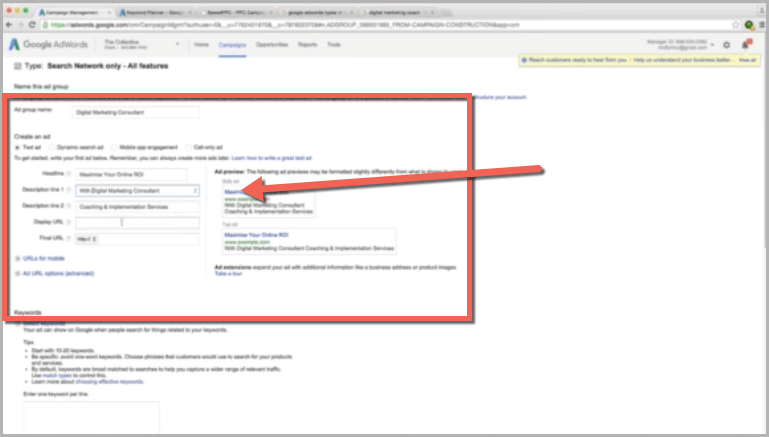
By filling in the boxes on the left of this page you will automatically produce a preview of your ad on the right hand side.
Try and use your keyword in the description and make the headline benefit driven. In this example I have used the headline “Maximise Your Online ROI” when creating an ad for “Digital Marketing Consultant”.
The last box in this section is the “Final URL” which is the page you want people to go to after they click on your ad.
You may even choose to change the “Display URL” so it includes the exact keywords you are running the ad for.
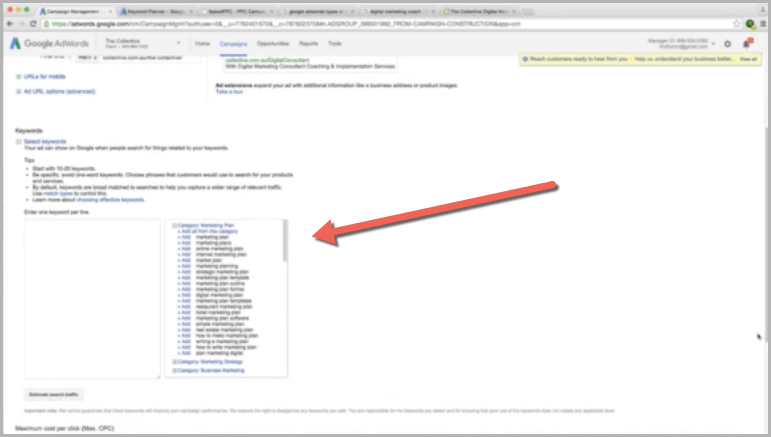
Once you have designed the ad, you will need to choose the keywords (or search terms) you want the ad to show for. This should be easy to do if you’ve already done your keyword research.

Then, hit “Save Ad Group”.
Step 4 – Name Your Ad Group and Design More Ads
The problem you’ve got at this stage is that there is only one ad. So you want to go to the “ads” section of the next screen and create a “New Text Ad”.
Your goal is to come up with another ad that will outperform the original. So simply change a few elements of the first ad to test its performance.
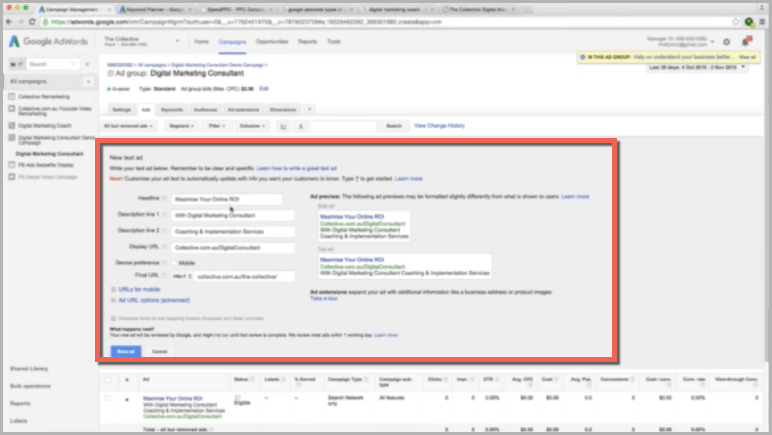
Just change one or two things and over time you can monitor the click through rate and cost per conversion to see what is performing better.
You now effectively have your campaign and the first ad group created.
But remember we want to have multiple ad groups…
Step 5 – Create Multiple Ad Groups
Go back to your keyword research and pick the next primary keyword you want to create an ad group for, then hit “+ Ad Group”
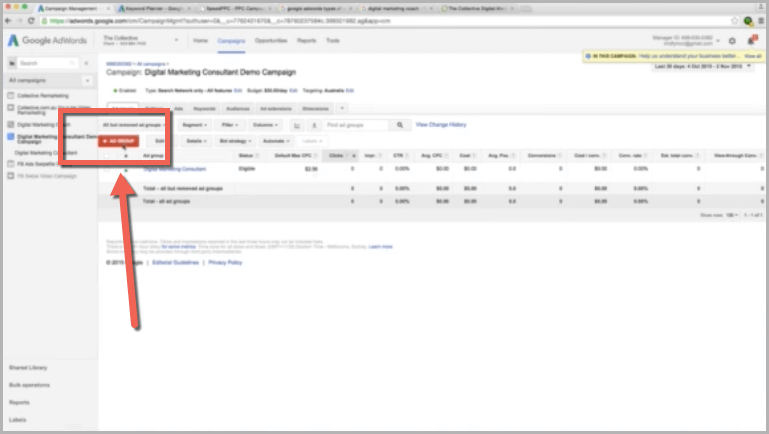
You can go through the same process you did for the first ad group and a create a new set of ads for this primary keyword.
It will automatically populate the form with your previous ad, this will save you a lot of time because you won’t need to start from scratch.
Your goal is to make these Ad Groups as relevant as possible based on the search terms you have chosen.
You can see that once you have done all the hard work of the keyword research, it makes building the campaign much much quicker. Just remember to create multiple ads for EACH Ad Group so that you can test and optimise for click throughs and cost per acquisition.
Step 6 – Add Your Negative Keywords
It’s important not to forget to add in your negative keywords too… The search terms that you don’t want your ad to show up for.
You can do that really easily in the keywords tab of the campaign manager.
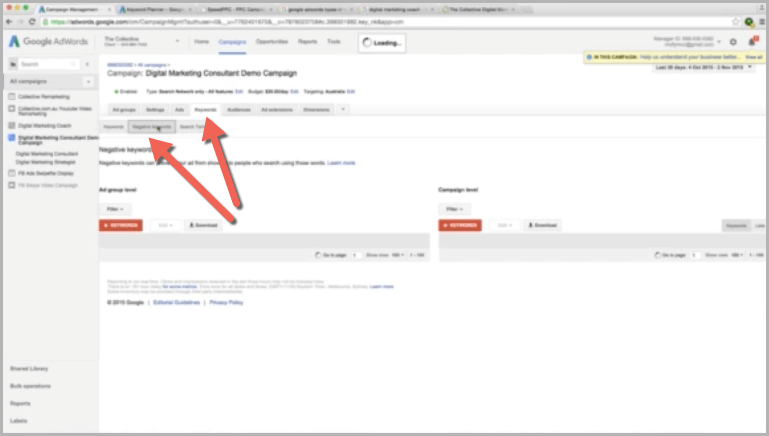
It makes most sense to add them at the campaign level, because this covers all of your ad groups.
Sum up
Now you have your Adwords campaign all setup with campaign settings, appropriate bidding and scheduling, multiple groups, the ads themselves, keywords and negative keywords.
It’s time to let your ad run for a while and see what happens. From here it’s about optimising and refining your campaign to get the best ROI.